有關 Solvespace 機構模擬功能介紹, 與 Python3 及 Brython 程式驗證
Solvespace 平面四連桿機構模擬
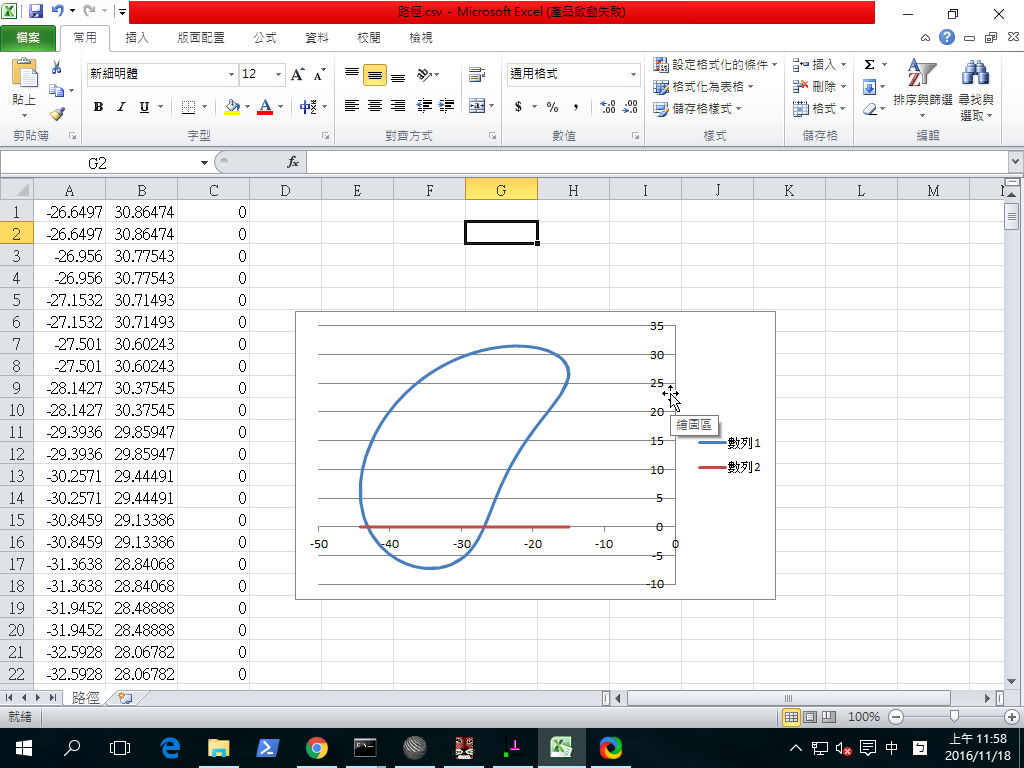
直接利用 Solvespace Analyze-Trace Point-Stop Trace 得到下列繞行路徑:
tracepoint from 李彥錞 on Vimeo.
將所得到的點座標 .csv 以 Excel 畫圖, 得到:
Python3 平面四連桿機構模擬:
接下來利用三角函數推導四連桿機構的運動模擬, 即已知長度 18 公分的連桿以逆時針方向旋轉, 希望求三角形頂點的運動座標.
首先利用 Brython, 讀取 data 目錄中的 cadpa_w10_4bar.csv 座標檔案, 然後以 splitlines() 及 split() 取出各點的 x 座標與 y 座標後, 將點連成路徑曲線如下:
Ubuntu 安裝 matplotlib:
sudo apt-get install python3-matplotlib
import math
import time
# 利用 matplotlib 程式庫畫出 contour 輪廓
import matplotlib.pyplot as plt

class Coord(object):
    def __init__(self,x,y):
        self.x = x
        self.y = y

    def __sub__(self,other):
        # This allows you to substract vectors
        return Coord(self.x-other.x,self.y-other.y)

    def __repr__(self):
        # Used to get human readable coordinates when printing
        return "Coord(%f,%f)"%(self.x,self.y)

    def length(self):
        # Returns the length of the vector
        return math.sqrt(self.x**2 + self.y**2)

    def angle(self):
        # Returns the vector's angle
        return math.atan2(self.y,self.x)

def normalize(coord):
    return Coord(
        coord.x/coord.length(),
        coord.y/coord.length()
        )

def perpendicular(coord):
    # Shifts the angle by pi/2 and calculate the coordinates
    # using the original vector length
    return Coord(
        coord.length()*math.cos(coord.angle()+math.pi/2),
        coord.length()*math.sin(coord.angle()+math.pi/2)
        )


# 點類別
class Point(object):
    # 起始方法
    def __init__(self, x, y):
        self.x = x
        self.y = y

    # 加入 Eq 方法
    def Eq(self, pt):
        self.x = pt.x
        self.y = pt.y

    # 加入 setPoint 方法
    def setPoint(self, px, py):
        self.x = px
        self.y = py

    # 加上 distance(pt) 方法, 計算點到 pt 的距離
    def distance(self, pt):
        self.pt = pt
        x = self.x - self.pt.x
        y = self.y - self.pt.y
        return math.sqrt(x * x + y * y)


# Line 類別物件
class Line(object):

    # 起始方法
    def __init__(self, p1, p2):
        self.p1 = p1
        self.p2 = p2
        # 直線的第一點, 設為線尾
        self.Tail = self.p1
        # 直線組成的第二點, 設為線頭
        self.Head = self.p2
        # 直線的長度屬性
        self.length = math.sqrt(math.pow(self.p2.x-self.p1.x, 2)+math.pow(self.p2.y-self.p1.y,2))

    # setPP 以指定頭尾座標點來定義直線
    def setPP(self, p1, p2):
        self.p1 = p1
        self.p2 = p2
        self.Tail = self.p1
        self.Head = self.p2
        self.length = math.sqrt(math.pow(self.p2.x-self.p1.x, 2)+math.pow(self.p2.y-self.p1.y,2))

    # setRT 方法 for Line, 應該已經確定 Tail 點, 然後以 r, t 作為設定 Head 的參考
    def setRT(self, r, t):
        self.r = r
        self.t = t
        x = self.r * math.cos(self.t)
        y = self.r * math.sin(self.t)
        self.Tail.Eq(self.p1)
        self.Head.setPoint(self.Tail.x + x,self.Tail.y + y)

    # getR 方法 for Line
    def getR(self):
        # x 分量與 y 分量
        x = self.p1.x - self.p2.x
        y = self.p1.y - self.p2.y
        return math.sqrt(x * x + y * y)

    # 根據定義 atan2(y,x), 表示 (x,y) 與 正 x 軸之間的夾角, 介於 pi 與 -pi 間
    def getT(self):
        x = self.p2.x - self.p1.x
        y = self.p2.y - self.p1.y
        if (math.fabs(x) < math.pow(10,-100)):
            if(y < 0.0):
                return (-math.pi/2)
            else:
                return (math.pi/2)
        else:
            return math.atan2(y, x)

    # setTail 方法 for Line
    def setTail(self, pt):
        self.pt = pt
        self.Tail.Eq(pt)
        self.Head.setPoint(self.pt.x + self.x, self.pt.y + self.y)

    # getHead 方法 for Line
    def getHead(self):
        return self.Head

    def getTail(self):
        return self.Tail


class Link(Line):
    def __init__(self, p1, p2):
        self.p1 = p1
        self.p2 = p2
        self.length = math.sqrt(math.pow((self.p2.x - self.p1.x), 2) + math.pow((self.p2.y - self.p1.y), 2))


class Triangle(object):
    def __init__(self, p1, p2, p3):
        self.p1 = p1
        self.p2 = p2
        self.p3 = p3

    def getLenp3(self):
        p1 = self.p1
        ret = p1.distance(self.p2)
        return ret

    def getLenp1(self):
        p2 = self.p2
        ret = p2.distance(self.p3)
        return ret

    def getLenp2(self):
        p1 = self.p1
        ret = p1.distance(self.p3)
        return ret

    # 角度
    def getAp1(self):
        ret = math.acos(((self.getLenp2() * self.getLenp2() + self.getLenp3() * self.getLenp3()) - self.getLenp1() * self.getLenp1()) / (2* self.getLenp2() * self.getLenp3()))
        return ret

    def getAp2(self):
        ret =math.acos(((self.getLenp1() * self.getLenp1() + self.getLenp3() * self.getLenp3()) - self.getLenp2() * self.getLenp2()) / (2* self.getLenp1() * self.getLenp3()))
        return ret

    def getAp3(self):
        ret = math.acos(((self.getLenp1() * self.getLenp1() + self.getLenp2() * self.getLenp2()) - self.getLenp3() * self.getLenp3()) / (2* self.getLenp1() * self.getLenp2()))
        return ret

    # ends Triangle def
    # 透過三個邊長定義三角形
    def setSSS(self, lenp3, lenp1, lenp2):
        self.lenp3 = lenp3
        self.lenp1 = lenp1
        self.lenp2 = lenp2
        self.ap1 = math.acos(((self.lenp2 * self.lenp2 + self.lenp3 * self.lenp3) - self.lenp1 * self.lenp1) / (2* self.lenp2 * self.lenp3))
        self.ap2 = math.acos(((self.lenp1 * self.lenp1 + self.lenp3 * self.lenp3) - self.lenp2 * self.lenp2) / (2* self.lenp1 * self.lenp3))
        self.ap3 = math.acos(((self.lenp1 * self.lenp1 + self.lenp2 * self.lenp2) - self.lenp3 * self.lenp3) / (2* self.lenp1 * self.lenp2))

    # 透過兩個邊長與夾角定義三角形
    def setSAS(self, lenp3, ap2, lenp1):
        self.lenp3 = lenp3
        self.ap2 = ap2
        self.lenp1 = lenp1
        self.lenp2 = math.sqrt((self.lenp3 * self.lenp3 + self.lenp1 * self.lenp1) - 2* self.lenp3 * self.lenp1 * math.cos(self.ap2))
        #等於 SSS(AB, BC, CA)

    def setSaSS(self, lenp2, lenp3, lenp1):
        self.lenp2 = lenp2
        self.lenp3 = lenp3
        self.lenp1 = lenp1
        if(self.lenp1 > (self.lenp2 + self.lenp3)):
        #CAB 夾角為 180 度, 三點共線且 A 介於 BC 之間
            ret = math.pi
        else :
            # CAB 夾角為 0, 三點共線且 A 不在 BC 之間
            if((self.lenp1 < (self.lenp2 - self.lenp3)) or (self.lenp1 < (self.lenp3 - self.lenp2))):
                ret = 0.0
            else :
            # 透過餘絃定理求出夾角 CAB
                ret = math.acos(((self.lenp2 * self.lenp2 + self.lenp3 * self.lenp3) - self.lenp1 * self.lenp1) / (2 * self.lenp2 * self.lenp3))
        return ret

    # 取得三角形的三個邊長值
    def getSSS(self):
        temp = []
        temp.append( self.getLenp1() )
        temp.append( self.getLenp2() )
        temp.append( self.getLenp3() )
        return temp

    # 取得三角形的三個角度值
    def getAAA(self):
        temp = []
        temp.append( self.getAp1() )
        temp.append( self.getAp2() )
        temp.append( self.getAp3() )
        return temp

    # 取得三角形的三個角度與三個邊長
    def getASASAS(self):
        temp = []
        temp.append(self.getAp1())
        temp.append(self.getLenp1())
        temp.append(self.getAp2())
        temp.append(self.getLenp2())
        temp.append(self.getAp3())
        temp.append(self.getLenp3())
        return temp

    #2P 2L return mid P
    def setPPSS(self, p1, p3, lenp1, lenp3):
        temp = []
        self.p1 = p1
        self.p3 = p3
        self.lenp1 = lenp1
        self.lenp3 = lenp3

        #bp3 is the angle beside p3 point, cp3 is the angle for line23, p2 is the output
        line31 = Line(p3, p1)
        self.lenp2 = line31.getR()
        #self.lenp2 = self.p3.distance(self.p1)
        #這裡是求角3
        ap3 = math.acos(((self.lenp1 * self.lenp1 + self.lenp2 * self.lenp2) - self.lenp3 * self.lenp3) / (2 * self.lenp1 * self.lenp2))
        #ap3 = math.acos(((self.lenp1 * self.lenp1 + self.lenp3 * self.lenp3) - self.lenp2 * self.lenp2) / (2 * self.lenp1 * self.lenp3))
        bp3 = line31.getT()
        cp3 = bp3 - ap3
        temp.append(p3.x + self.lenp1*math.cos(cp3))#p2.x
        temp.append(p3.y + self.lenp1*math.sin(cp3))#p2.y
        return temp

# 以上為相關函式物件的定義區
# 全域變數
midpt = Point(0, 0)
tippt = Point(0, 0)
contour = []

# 幾何位置輸入變數
x=10
y=10
r=10

# 其他輸入變數
theta = 0
degree = math.pi/180.0
dx = 2
dy = 4

#set p1.p2.p3.p4 position
p1 =  Point(150,100)
p2 =  Point(150,200)
p3 =  Point(300,300)
p4 =  Point(350,100)

#create links
line1 =  Link(p1,p2)
line2 =  Link(p2,p3)
line3 =  Link(p3,p4)
line4 =  Link(p1,p4)
line5 =  Link(p2,p4)

link2_len = p2.distance(p3)
link3_len = p3.distance(p4)

triangle1 =  Triangle(p1,p2,p4)
triangle2 =  Triangle(p2,p3,p4)

def simulate():
    global theta, midpt, oldpt
    theta += dx
    p2.x = p1.x + line1.length*math.cos(theta*degree)
    p2.y = p1.y - line1.length*math.sin(theta*degree)
    p3.x, p3.y = triangle2.setPPSS(p2,p4,link2_len,link3_len)
    # 計算垂直單位向量
    a = Coord(p3.x, p3.y)
    b = Coord(p2.x, p2.y)
    normal = perpendicular(normalize(a-b))
    midpt.x = (p2.x + p3.x)/2
    midpt.y = (p2.y + p3.y)/2
    tippt.x = midpt.x + 150*normal.x
    tippt.y = midpt.y + 150*normal.y
    # 印出座標點
    #print(round(tippt.x, 2), round(tippt.y, 2))
    if theta < 360:
        contour.append((round(tippt.x, 2), round(tippt.y, 2)))

for i in range(180):
    simulate()
# 印出 contour
#print(contour)

x_list = [x for (x, y) in contour]
y_list = [y for (x, y) in contour]

plt.xlabel('x coordinate')
plt.ylabel('y coordinate')

plt.plot(x_list, y_list)
plt.show()
以下將上述四連桿模擬程式移到近端的 Jupyter 平台中執行:
以下將上述四連桿模擬程式移到 Jupyterhub 平台中執行:
以下再利用 Brython 繪出四連桿模擬特定點的掃掠圖:
以下利用 Brython 動態畫出四連桿機構模擬圖:
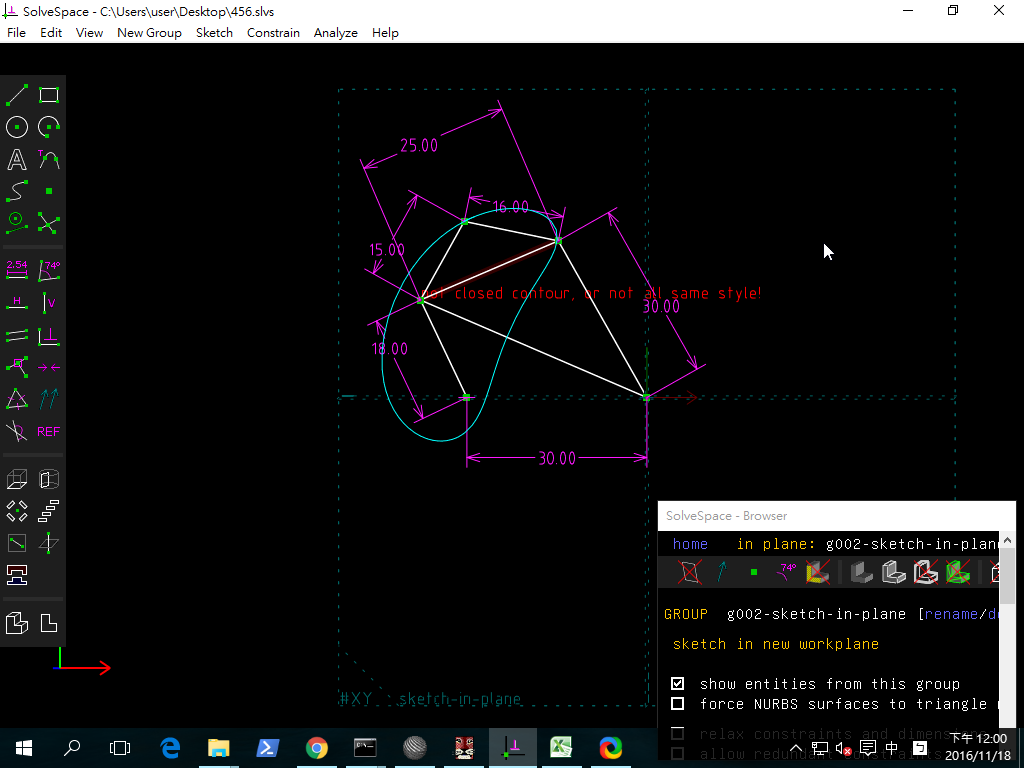
以下利用 Solvespace 繪圖法進行相同機構模擬驗證:
以下再利用 Solvespace 程式 API 方法進行四連桿模擬驗證:
以下以 Delta 3D 印表機印出連桿零件, 組立後以步進馬達驅動進行驗證:
以下利用伸縮連桿設計, 以 Delta 3D 印表機印出連桿零件, 組立後以步進馬達驅動進行驗證:
請以上述相同流程, 模擬並實作驗證 多連桿機構的作動.